
Configuring the automatic release of an agent’s messaging capacity lets admins specify how long a conversation can go without input from an end user before it’s marked inactive. Depending on your omnichannel routing configuration, marking a conversation as inactive can remove the ticket from an agent’s capacity, allowing another conversation to be routed to them without requiring them to manually update the ticket status.
This article describes how admins can configure the auto-release capacity settings, including the inactivity period and the ticket status used for inactive messaging tickets. Additionally, admins can configure up to three reminders to be sent to end users when their conversation becomes inactive.
About active and inactive messaging tickets
- Active tickets are those with recent responses from the end user.
-
Inactive tickets are those that haven’t had a response from the end user in a specified period of time, or that have a status other than New or Open. By default, Zendesk defines a messaging ticket as inactive when an end user hasn’t sent a reply in the last 10 minutes.
Note: The capacity release settings, including the inactivity period, apply only to messaging conversations already assigned to agents. The default inactivity period of 10 minutes is used for all unassigned messaging conversations.
Considerations when using the capacity release settings
Consider the following when turning on and configuring the automatic release of agent capacity:
- If you don’t use the auto-release capacity settings, Zendesk applies a default inactivity period of 10 minutes without a response from the end user.
- The auto-release capacity settings are applied to all open messaging tickets currently assigned to agents and to those that are created or reopened after these settings are saved.
- When using the default inactivity period and the messaging activity routing setting for omnichannel routing is turned off, a messaging ticket no longer counts towards an agent’s capacity when it becomes inactive, but the ticket's status doesn’t change.
- Inactivity reminders are available for the Web Widget, iOS and Android SDKs, and Zendesk-supported social messaging channels.
- The auto-release capacity setting provides a powerful way to manage agent capacity when used with omnichannel routing, but can also be used effectively with other business rules that rely on changes in ticket status.
- You must be an admin to configure the auto-release capacity setting.
- To avoid any unexpected behavior, we recommend turning on the auto-release capacity setting during a low-volume time.
- It can take up to 10 minutes for updates to the auto-release capacity setting to begin working.
- If an AI agent is in use, inactivity reminders are sent to end users from that AI agent, and the avatar and bot name associated with it are displayed with the message. If no AI agent is in use, the logo associated with the Web Widget appears with the message.
Configuring the auto-release capacity setting
Admins can use the auto-release capacity setting to help agents manage their capacities, and help end users remember to keep a conversation active if they want. These settings can also help business rules, such as triggers, to run more effectively on tickets because they alter the ticket status when a conversation becomes inactive. The change in ticket status is captured in the ticket’s audit events:

When omnichannel routing is configured not to count inactive conversations toward agent capacity, the capacity release settings can increase efficiency by automatically releasing an agent's capacity without requiring them to manually alter the ticket's status.
Auto-release capacity and inactivity reminders are turned on and configured by default. The default configuration sends three reminders with simple message text.
- The initial reminder is sent after five minutes of end-user inactivity, and updates the ticket’s status to Pending.
- The second reminder is sent after another five minutes of end-user inactivity, and does not update the ticket’s status.
- The third and final reminder is sent after one additional minute of end-user inactivity, and updates the ticket’s status to Solved.
You can keep these default settings, customize them, or turn off automatic capacity release.
- In Admin Center, click
 Channels in the sidebar, then select Messaging and social > Messaging.
 - In the Advanced section, click Capacity release. Make sure Turn on auto-release capacity is selected.

- Under Inactivity period, enter a whole number from 3 to 15. This is the time in minutes a conversation can go without a reply from an end user before it is considered active. This time is measured from the agent’s last sent message.
- Under Ticket status for inactive conversations, select a status to automatically apply to inactive tickets. You can select Pending, On-hold, Solved, or a custom status mapped to these ticket status categories. New and Open statuses can’t be used. Triggers using the selected status as a condition will fire when the new status is applied.
- Under Remind customers about inactive conversations, select the number of reminders (up to three) you want to send to end users. Select Do not remind if you do not want to send any messages to end users when a conversation becomes inactive. Select 1 reminder, 2 reminders, or 3 reminders to send inactivity reminders to end users, and configure the inactivity reminders before saving these settings.
Note that if you select Solved as the ticket status for the initial inactivity period, you will only be able to select Do not remind or 1 reminder.
- Click Save settings.
Configuring inactivity reminders for end users
For most accounts, auto-release capacity and inactivity reminders are turned on and configured by default for the Web Widget, iOS and Android SDKs, and Zendesk-supported social messaging channels. When turned on, the default configuration sends three reminders with simple message text, in the account’s default language. You can keep these default settings or customize them as needed.
By default:
- The First reminder is sent after five minutes of end-user inactivity, and updates the ticket’s status to Pending.
- The Second reminder is sent after another five minutes of end-user inactivity, and does not update the ticket’s status.
- The Third reminder is sent after one additional minute of end-user inactivity, and updates the ticket’s status to Solved.
To customize your inactivity reminder settings
-
Configure your messaging capacity release settings. Under Remind customers about inactive conversations, select 1 reminder, 2 reminders, or 3 reminders. Subsequent reminder settings are displayed based on this selection.
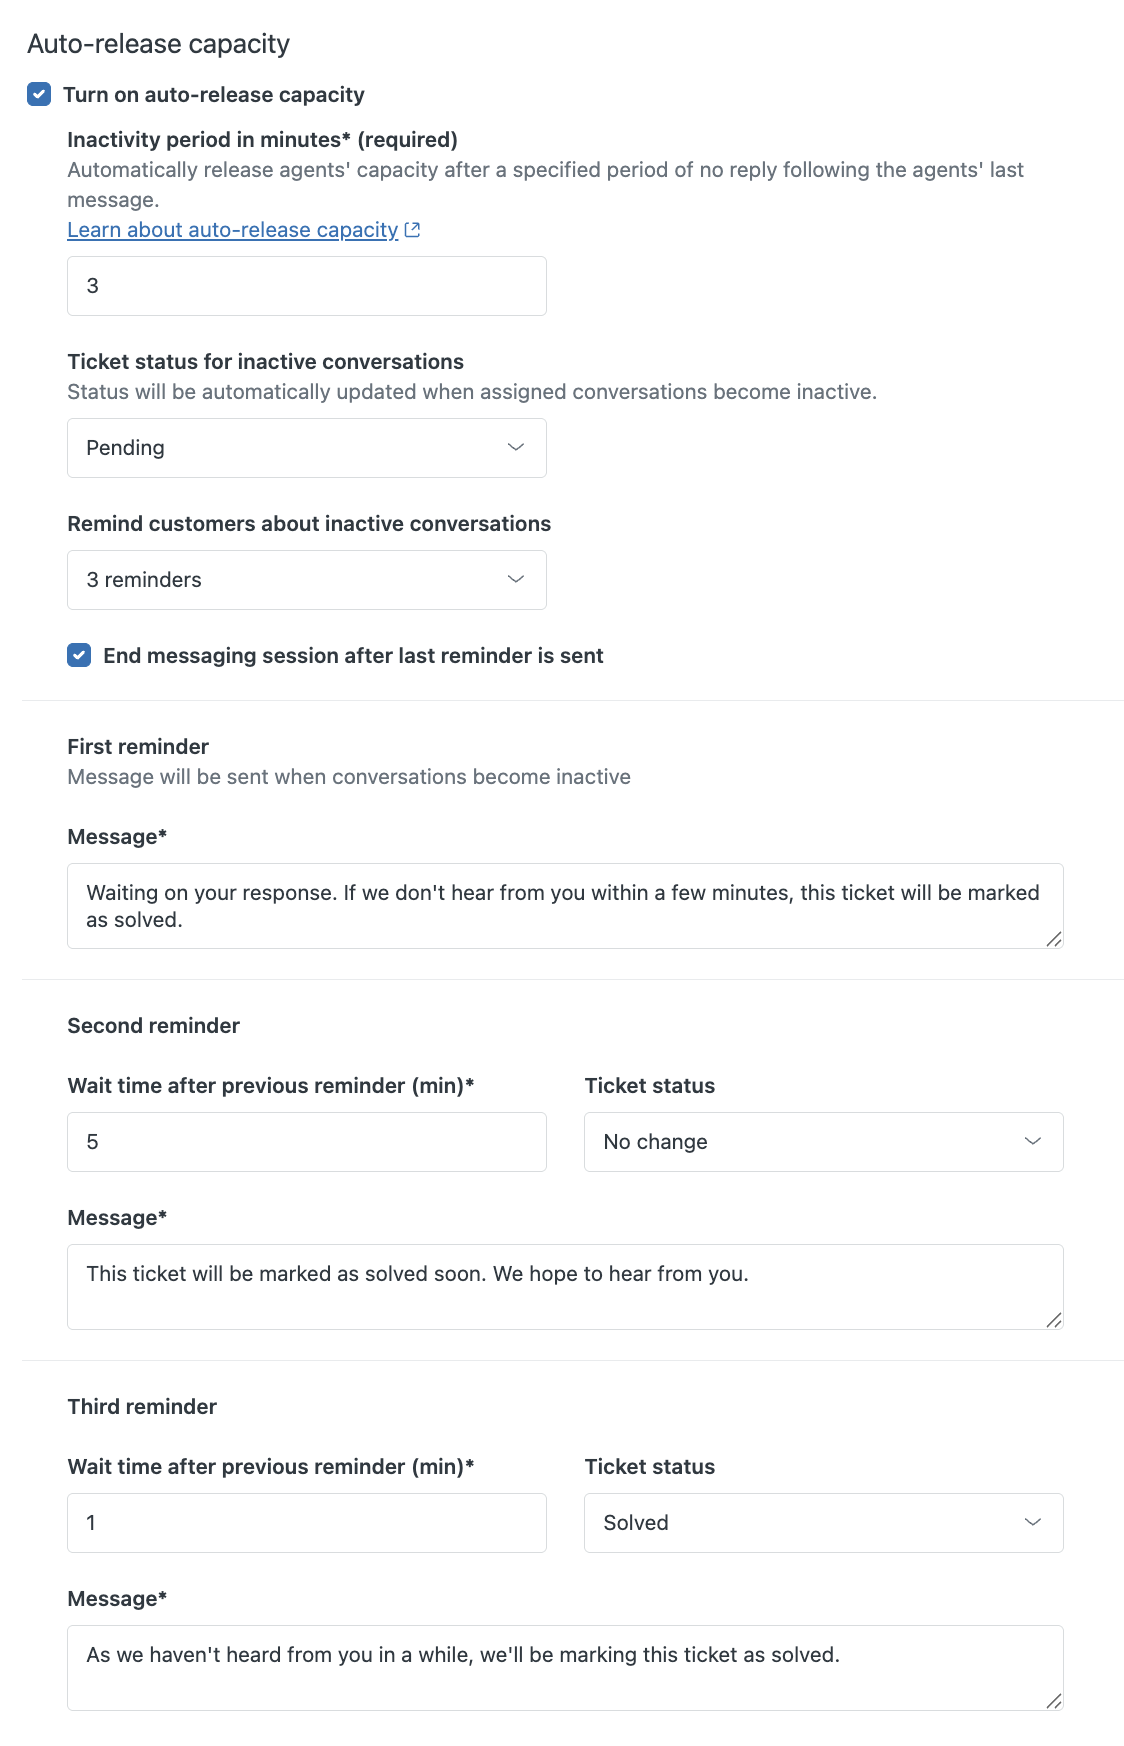
- Configure the reminders’ messages, inactivity periods, and ticket status changes as needed.
Note: You can use dynamic content in reminder messages to automatically translate or customize the messages for end users.
- First reminder: Enter the message you want to send when the initial inactivity period is reached, or use the default message. This reminder uses the wait time and ticket status configured for the initial messaging capacity release settings.
-
Second and Third reminders (if applicable): Enter a whole number between 1 and 15 for the Wait time after previous reminder in minutes. Enter the message you want to send and the status change you want to apply to the ticket when each subsequent inactivity period is reached. You can select No change, Pending, On-hold, Solved, or a custom status mapped to these ticket status categories. However, for the last reminder, you can only select Solved or a custom status mapped to this ticket status category.
Support ticket triggers using the selected ticket status as a condition will fire when the new status is applied.
- Click Save settings.
Comments
0 comments
Please sign in to leave a comment.